


Introduction
Model plants are essential for the advances in plant biology research [1]. So far, Arabidopsis thaliana has been widely used as a model plant. However, it is a dicotyledonous plant, so monocot model plants are necessary because monocots include cereals and grasses that provide the sources of foods and biofuels [2]. Oryza sativa (rice) has been used as a monocot model plant. However, it is a semi-aquatic tropical grass, i.e., not a suitable monocotyledonous plant for small grain cereals such as Triticum aestivum (wheat), Hordeum vulgare (barley), and Avena sativa (oats), and also for bioenergy crops such as miscanthus and switchgrass [3]. These considerations have led to the development of Brachypodium distachyon (hereafter, Brachypodium) as a new and alternative monocot model plant for temperate cereals and bioenergy crops [4−6].
Brachypodium has typical characteristics for being a model plant such as small stature (approximately 20−30 cm), diploidy (2n=10), short life cycle (~4 months), small genome (~270 Mb), self-pollination, and easy cultivation [3,5,7,8]. In addition, a series of genetic transformation methods for Brachypodium have been reported [9−14]. More recently, genome editing methods of Brachypodium are also developed using Agrobacterium tumefaciens (hereafter, Agrobacterium) for transformation [15]. Furthermore, numerous resources have been developed for working with Brachypodium, including a large germplasm collection and sequenced mutant collections, in addition to the completion of genome sequencing [16,17]. Therefore, Brachypodium research is moving forward rapidly as being a widely used monocot model plant.
For Brachypodium research, one of the major constraints would be the establishment of an efficient genetic transformation system. Genetic transformation makes possible to transfer gene(s) from one organism to another, which would not be possible using traditional plant breeding methods. Among the genetic transformation methods, Agrobacterium-mediated transformation is currently the predominant technology used to generate transgenic plants [18]. In addition, immature embryos are frequently used as explant materials for the efficient plant transformation, due to their high regeneration capacity [19]. Thus, we intended to describe about tissue culture and Agrobacterium- mediated transformation methods for Brachypodium using immature embryos, based on our experimental experience with two Brachypodium inbred lines, Bd21 and Bd21-3. Here, starting with the growth of Brachypodium plants to obtain immature embryos, we summarize the steps for the transformation procedures to obtain transgenic T1 plants efficiently. In addition, we explain about possible factors contributing to the genetic transformation of Brachypodium with the timeline.
Brachypodium Plant Growth
Seeds of B. ditachyon inbred lines (Bd21 or Bd21-3) were taken in a 50 mL conical tube and soaked with tap water for 20 min. Then, lemmas were removed completely to ensure seed germination using fingertips, and surface-sterilized in 70% (v/v) ethanol for 2 min, followed by 2% (w/v) sodium hypochlorite (NaOCl) for 7 min with gentle shaking. After rinsing in sterile distilled water (DW) 4−5 times, the de-husked seeds were kept submerged in DW inside the conical tube and placed at 4℃ for 7 days in the dark to ensure synchronous seed germination. The de-husked and surface-sterilized seeds were then placed on half-strength of Murashige and Skoog media (½MS) supplemented with 1% sucrose and 0.6% phytoagar, and grown under 16/8 or 18/6 hr light/dark cycle with 24.5 W/m2 of light intensity. Two-week-grown plantlets on the plates were transferred to autoclaved soil. During the transfer, the phytoagar should be removed completely with DW. As a note, seeds can be placed directly on the soil, but plant phenotypes such as tiller numbers and stem thicknesses appear to be better when the seeds are cultured on the ½MS plate first. In addition, due to dormancy of Bd21 seeds, it is recommended to use seeds at least 3 weeks after harvesting.
Around 10 plants were grown in a pot with 15 cm diameter under 18/6 hr light/dark cycle at 22℃ with the light intensity of 24.5 W/m2. The plants were watered twice a week and HYPONeX was given once a month as fertilizer. It is notable that the soil should not be dried out during the growth. After 7−9 weeks from the date of soil transfer, immature embryos with suitable sizes (~0.3 mm) could be collected for the induction of embryogenic calli by checking the state of embryos everyday. For seed amplification, seeds were harvested when Brachypodium seeds became completely dry by collecting them in paper envelopes. After incubating the envelops in 20℃ desiccator for at least 3 weeks, seeds were stored at 4℃ in airtight containers with silica gels.
Materials for Tissue Culture and Transformation
For the genetic transformation of Brachypodium, A. tumefaciens strain AGL1 is recommended due to its high virulence. In addition, vectors harboring hygromycin resistance as a selectable marker, such as pCAMBIA1301, are recommended over other selectable markers because of the strong and rapid selection. Stock solutions of phytohormones, antibiotics, and other reagents are listed in Table 1. In addition, culture media for A. tumefaciens and B. distachyon are listed in Table 2.
The Efficient Method for Agrobacterium-Mediated Transformation of Brachypodium
We summarize a practical method for Brachypodium transformation with 18 steps, including the culture for the induction of embryogenic calli (STEP 1 to 8), Agrobacterium-mediated transformation (STEP 9 to 13), selection of transformed calluses (STEP 14 and 15), and regeneration of transgenic plantlets (STEP 16 to 18).
STEP 1. After plant growth in soil for 7 to 9 weeks, spikelets carrying seeds with immature embryos were taken (Fig. 1a and 1b). Then, the immature embryos with approximately 0.3 mm in length (Fig. 1c) were collected in a 50 mL conical tube containing a few mL of DW to avoid desiccation. The time for the collection of immature embryos is when caryopses have grown completely to the end of the palea and seeds are still soft and pliable, which is a critical step to obtain good embryogenic calli.
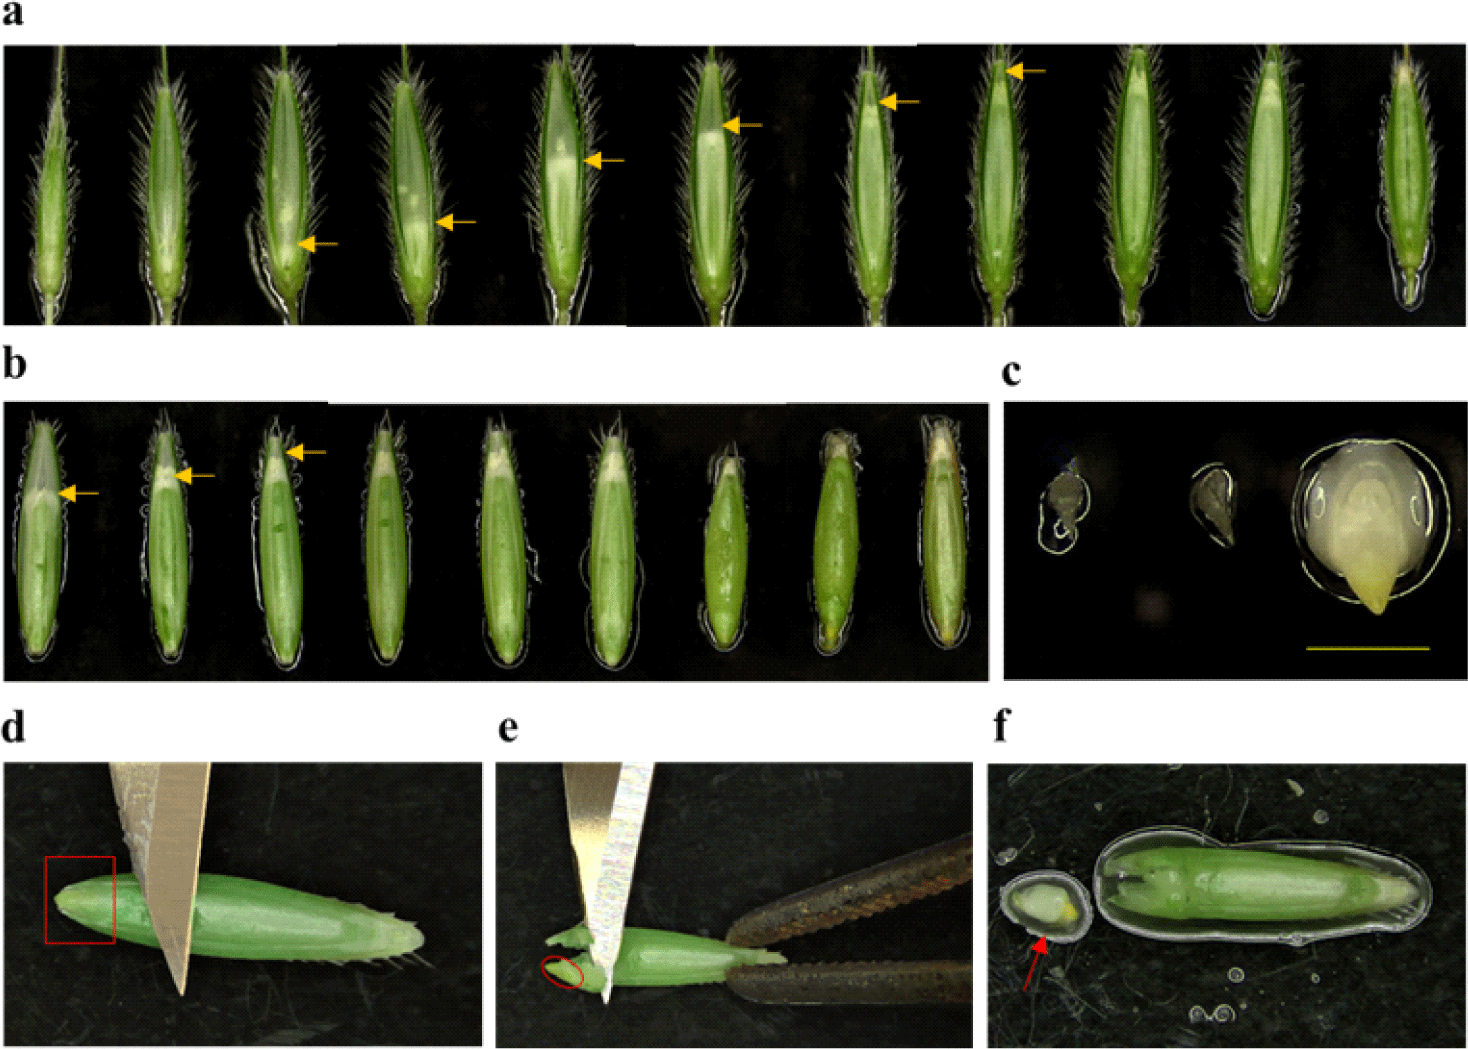
STEP 2. Lemmas were removed from the seeds very carefully using fingers, and the de-husked seeds were placed back into the tube containing a few mL of DW.
STEP 3. After removal of water in the tube, seeds were surface-sterilized in 70% (v/v) ethanol for 2 min, followed by 2% (w/v) sodium hypochlorite (NaOCl) for 5 min with gentle agitation. After rinsing in sterile DW 4−5 times, kept the seeds in the corning tube with 5 mL of sterile DW. This step and all the following steps should be carried out in a laminar-flow hood.
STEP 4. Approximately 10 seeds were placed on a sterile petri dish and immature embryos were isolated using a blunt forcep with a blade. The forcep was used to hold the seed and the blunt side of the blade was used to make gentle pressure on the seed near the immature embryo (Fig. 1d and 1e). The immature embryo locates at the lower end of the seed (i.e., very close to the surface), so gentle pressure is enough to take out the whole immature embryo from the seed without damage. A microscope can be used for this step if it is difficult to identify the immature embryo with naked eyes. Immature embryos with small sizes (~0.3 mm) are translucent and capable of producing good embryogenic calluses (Fig. 1f), whereas bigger size embryos (more than 0.5 mm) are white or yellow in color and usually produce soft, watery, or disorganized calli.
STEP 5. Isolated immature embryos were transferred onto CIM plates using forcep tips. Around 20 immature embryos were placed on the plate (90×15 mm). It does not matter whether the scutellum side is facing upward or downward on the medium. However, the immature embryos should not be pushed inside the medium: i.e., surface tension is enough to hold the immature embryo on the surface of the CIM plate.
STEP 6. Petri dishes were sealed with clean tape and placed at 25℃ for 3 to 4 weeks in the dark. In general, embryogenic calli began to form approximately a week after the incubation. Quality of the embryogenic calli could be determined by its color and structure, i.e., yellow and organized structure. It is notable that embryogenic calli of Bd21-3 are yellower than those of Bd21. In addition, it takes 3 weeks for Bd21 and 4 weeks for Bd21-3 to obtain embryogenic calli for sub-culturing to fresh CIM plates.
STEP 7. After 3−4 weeks, only yellow embryogenic parts from each callus were cut and transferred to fresh CIM plates (Fig. 2a), whereas amorphous parts were discarded. The plates were further incubated for 2 more weeks. In this step, it is important to select only embryogenic (i.e., high quality) calli by avoiding damaging or mashing calli. Very sharp blades should be used to make clean cuts of a callus into 4 to 5 pieces (~1 mm), and around 20 pieces of embryogenic calli were kept in one plate.
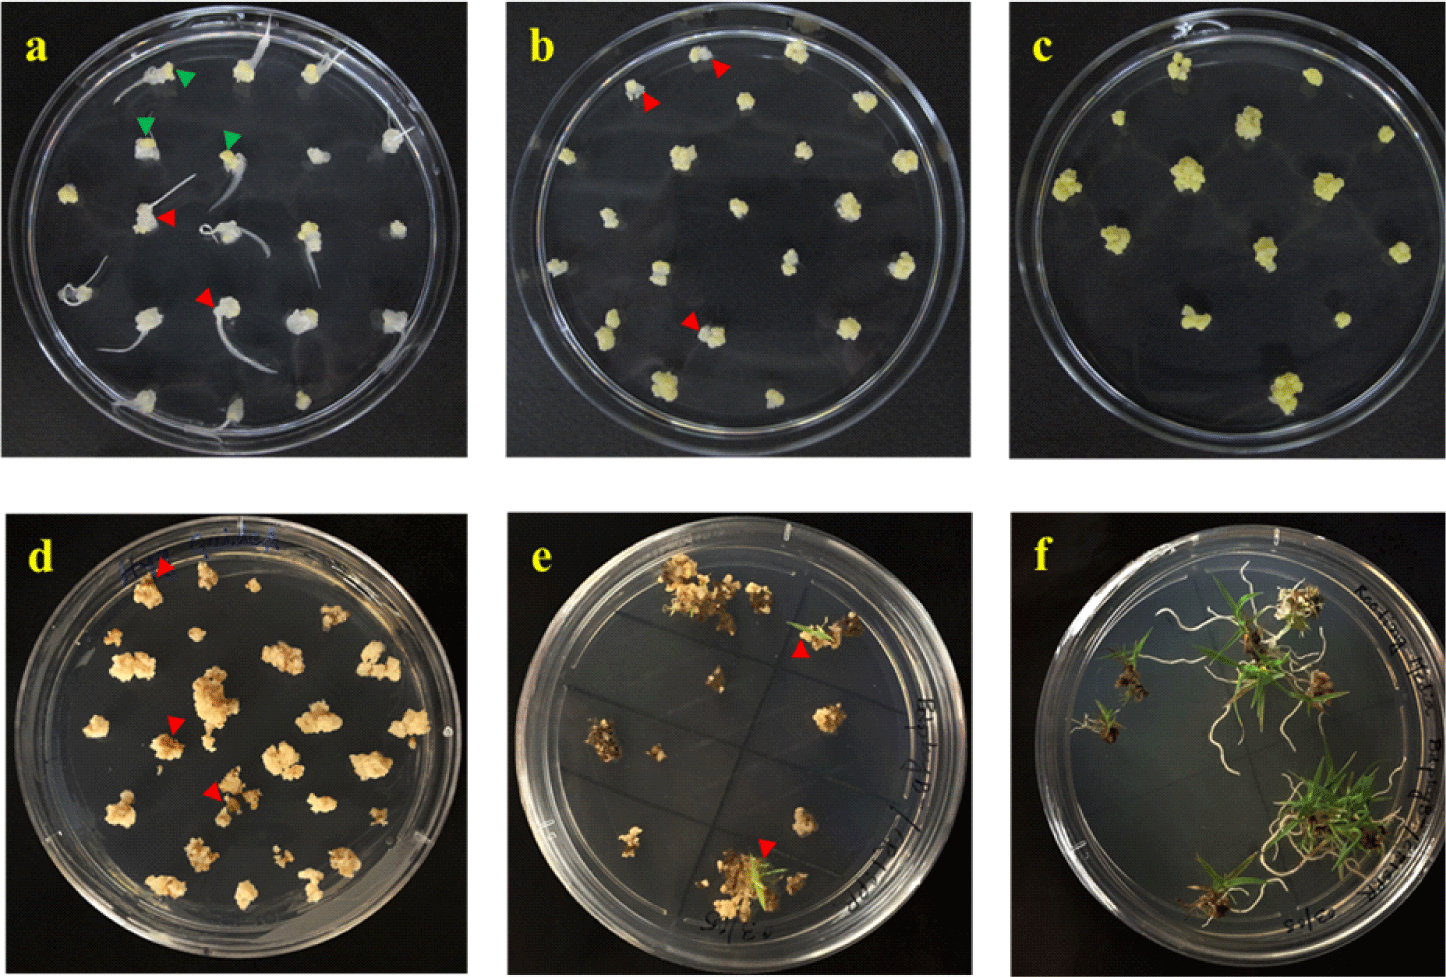
STEP 8. After 2 weeks, each callus was cut into 3−4 pieces (~2 mm), transferred to fresh CIM plates, and incubated for 1 week. At this step, the calli should be appeared more organized than those in the previous sub-culture (Fig. 2b). At the end of this sub-culture, each immature embryo usually generates around 16−20 embryogenic calli.
STEP 9. Three days before transformation, A. temefaciens (usually strain AGL1) harboring a vector with a selectable marker such as hygromycin resistance gene was cultured overnight at 28℃ in 1 mL of LB containing 1 μL of carbenicillin (100 mg/mL), 1 μL of acetosyringone (200 mM), and the antibiotic for selection depending on the vector used. Next morning, 200 μL of the culture was transferred and evenly distributed on MG/L medium plates by spreading (Fig. 3a), and incubated at 28℃ for 2 days.
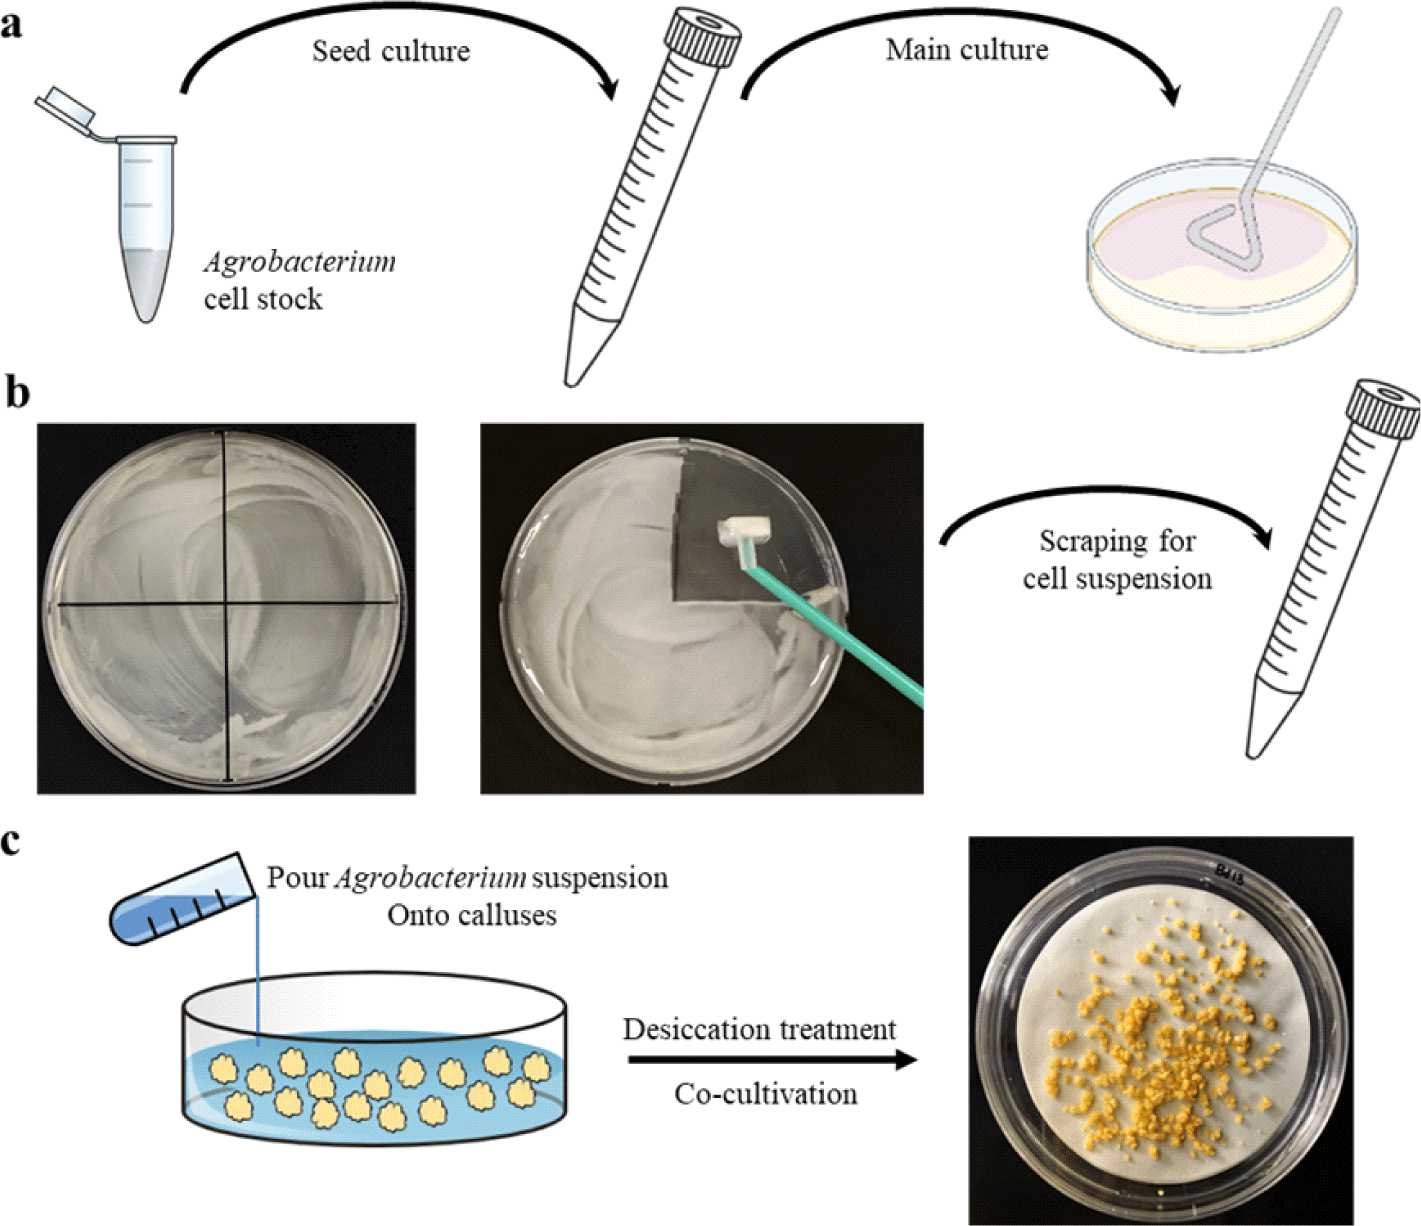
STEP 10. After the growth, Agrobacterium cells were scraped from the plates using a cell scrapper (SPL Life Sciences, 90020) and transferred to a sterile 50 mL conical tube containing 10 mL of liquid CIM (Fig. 3b). Then, the cells were completely suspended using a vortex and adjusted O.D600 to 0.6 using a spectrophotometer by adding more suspension or liquid CIM. Generally, 30 mL of Agrobacterium cell suspension is enough to transform around 200 calluses. 30 μL of 200 mM acetosyringone stock solution was added to the 30 mL of the suspension before the inoculation with embryogenic calluses.
STEP 11. Around 200 calluses, as shown in Fig. 2c, were taken from the CIM plates, and transferred in a sterile petri dish (100×40 mm) containing a few mL of liquid CIM to avoid desiccation. The Agrobacterium suspension were poured onto the calluses, the dishes were swirled for 30 s, and kept still for 5 min (Fig. 3c). At this step, breaking the calluses should be avoided as much as possible. Then, the Agrobacterium suspension were removed carefully using a pipette with sterile tips.
STEP 12. Two sterile and dry filter papers (125 mm in diameter) were placed in a petri dish (150×20 mm), and the Agrobacterium-inoculated calluses were transferred carefully onto the filter papers using a forcep (Fig. 3c). The calluses were left uncovered under the laminar-flow hood for 7−10 min for drying. As a note, since there is no washing step, this desiccation treatment is very important for avoiding the overgrowth of Agrobacterium cells during the Brachypodium transformation.
STEP 13. After the desiccation treatment, calluses were divided into two parts and transferred to two petri dishes (150×20 mm), each containing approximately 100 calluses on dry filter papers (Fig. 3c). The plates were then incubated at 25℃ for 3 days in the dark. As a note, the calluses should not be over-crowded on the filter papers to provide enough spaces between the calluses for proper drying. After the co-cultivation, calluses appeared dry and shrunken, which is important to avoid Agrobacterium overgrowth in next steps. If the calluses appear yellow, moist, and healthy, the desiccation treatment has not been done properly, resulting in a high risk of Agrobacterium overgrowth problem. It is also notable that, once Agrobacterium overgrowth happens, it is almost impossible to kill the cells, so all the calluses would be eventually discarded. Thus, the control of Agrobacterium overgrowth is critical for the success of Brachypodium transformation.
STEP 14. After 3 days of co-cultivation, calluses were transferred directly onto the SM plates with hygromycin, and incubated at 25℃ for a week in the dark. For convenience, the petri dish (90×20 mm) is divided in 16 boxes by drawing 3 horizontal and 3 vertical lines at the bottom of the plate using a marker, and each callus including broken pieces is kept in one box to make enough spaces between the calluses and also for maintaining independent transgenic lines.
STEP 15. After a week, calluses were sub-cultured on fresh SM plates and incubated at 25℃ for 2 weeks in the dark. As a note, the appearance of calluses varies depending on the selection agent, in which hygromycin is the strongest selection agent so most of the non-transformed calluses trun brown or black within a week on the SM plates (Fig. 2d). If a callus appears mostly brown/black but a small part remains healthy, only the healthy part could be transferred to fresh SM plates. As another note, if a callus is broken into pieces during the transfer, all the broken pieces should be kept in the same box on the plate, which will be considered as one independent line.
STEP 16. After 2 weeks, healthy calluses were transferred to RGM plates and incubated at 28℃ for 3 weeks under 16/8 hr light/dark cycle. During the incubation, usually green dots and shoots are emerged from the calluses (Fig. 2e). As a note, incubation at 28℃ is helpful for a faster shoot regeneration than that at 25℃.
STEP 17. After 3 or 4 weeks, the shoots with 1−2 cm lengths were transferred to RM plates. At the same time, calluses with green dots were sub-cultured on fresh RGM plates one more time at 28℃ for 3 weeks. Once shoots with 1−2 cm length were formed, they were also transferred to the RM plates.
STEP 18. The rooting status on the RM plates were checked periodically, and the plantlets with 2−3 healthy roots around 2−5 cm in length (Fig. 2f) were transferred to the soil. During the transfer, the phytagel should be removed carefully from the roots with DW. After the soil transfer, pots were kept covered with a clear plastic bag for 7 days to avoid desiccation. After around 12−16 weeks, the T1 seeds of putative transgenic plants could be harvested.
TIMELINE. The process for the induction of embryogenic calli (STEP 1 to 8), starting from 7 to 9 week-old plants, takes approximately 6 weeks for Bd21 (i.e., 3+2+1 weeks) and 7 weeks for Bd21-3 (i.e., 4+2+1 weeks). The process from co-cultivation to rooting (STEP 13 to 18) takes around 9 or 10 weeks [Co-cultivation, 3 days; Selection, 1+2=3 weeks; Regeneration, 3−4 weeks; Rooting, 3 weeks]. In addition, the time to harvest T1 seeds from plantlets with roots requires about 12−16 weeks, if 16/8 hr light/dark cycle was applied. Considering that embrogenic calli are supplied constantly, the overall process from co-cultivation to obtain T1 seeds takes approximately 22−26 weeks, respectively. For the efficient control of Brachypodium transformation, it is recommended to grow new batch of plants in every 2 weeks to ensure a steady supply of immature embryos when needed.
Conclusion
Using this method described above, we could have successfully obtained transgenic Brachypodium plants of two inbred lines, Bd21 and Bd21-3. When transformation efficiencies were estimated from the number of hygromycin-resistant plantlets per the number of embryogenic calluses used for co-cultivation, it was ~40% for Bd21 (~20 plantlets out of 50 embryogenic calluses) and ~60% for Bd21-3 (~30 plantlets out of 50 embryogenic calluses). Therefore, the transformation efficiencies obtained with this method are comparable with previous reports [9,10,13]. There are several factors contributing to the genetic transformation of Brachypodium. First, the quality of embryogenic calli is important (STEP 4 to 8). It is necessary to use immature embryos of around 0.3 mm in size (should be less than 0.5 mm) for the callus induction. In addition, only yellow and compact calli or yellowish parts with organized structure should be used for transformation by removing white and watery calli or amorphous parts. Second, co-cultivation step is critical for the successful transformation (STEP 11 to 13). Considering no washing step in this method, Agrobacterium overgrowth should be controlled by the desiccation treatment before co-cultivation. Once Agrobacterium overgrowth occurs, the calluses cannot be used for further steps. It is notable that over-desiccation should be also avoided. Third, growing Brachypodium plants in a healthy condition and seed storage are important for consistent transformation. The seeds should be harvested after proper desiccation period, but watering must not be stopped while seeds are still green. If any moisture remains in the seeds, germination might not be good. Thus, seed storage at 4℃ is recommended under very low humidity condition using an airtight container. Other factors such as Agrobacterium strain and selectable marker need to be also considered for the transformation efficiency. In our experience, Agrobacterium strain AGL1 grown on MG/L medium plates showed the best performance in Brachypodium transformation, compared with other strains such as GV3101, LBA4404, and EHA105. For the selectable marker, hygromycin resistance was the best in selecting transgenic plantlets, compared with herbicide resistance. When we used the hygromycin resistance for the selection, almost all the hygromycin-resistant plantlets are real transgenic plants. Since Brachypodium is now generally used as a monocot model plant, in addition to the dicot model plant A. thaliana, the method described here will provide potential benefits to the researchers who are interested in using B. distachyon as an alternative model system.